We’ve had a couple of very busy weeks here. There were some health issues we needed to get ironed out, and our iron wasn’t hot enough. Enough metaphors… My beloved Mr. Green Jeans has been in the hospital and I haven’t had time to do spit. Between working and visiting the hospital and doing all the home chores, well, there wasn’t much time for cooking. I at least ate reasonably well. Thank heaven for Trader Joe’s. I grabbed a few salads and wraps and that carried me through with only 1 Taco Bell stop and a Wendy’s visit I regretted almost immediately. Curiousity got the best of me. I lived, I learned. I hope to get back in the swing of things here again shortly. I’ve got lots of ingredients stashed in the freezer to play catch-up with. I’ve got 2 Whisk Wednesdays to catch up, and I’ll do some of that on Wed. coming up…because there are no frogs legs to be found. Hmmm…here’s a thought…could we sub chicken wings?? They kind of look like frogs legs? And since frog is supposed to taste like chicken…?? Never mind….I’ll be back here real soon! I can hardly wait to make Tyler Florence’s Lemon Pudding Cakes! I just have to get the chocolate cake eaten first! It was a gift…and it takes so long for cakes to be gone here!
Whisking Chicken Cordon Bleu
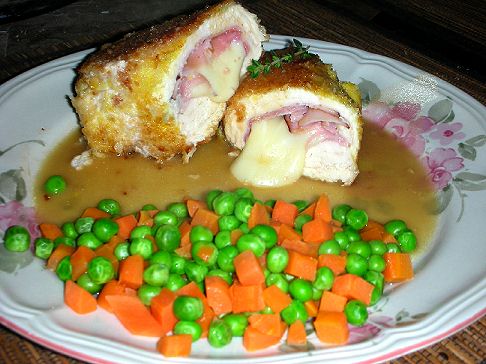
14 03 2009Chicken Cordon Bleu is a French-inspired poultry dish, although evidence suggests that Chicken Cordon Bleu was actually developed in the United States by chefs imitating other stuffed meat dishes from Europe. The name of the dish is clearly of French origin – Cordon Bleu means “blue ribbon” in French, and in French culinary tradition, the Cordon Bleu is awarded to food or chefs of particularly high quality. The European dish most similar to Chicken Cordon Bleu is Chicken Kiev, chicken stuffed with seasoned butter, dredged in bread crumbs, and fried. The dish was also likely heavily influenced by Veal Cordon Bleu, a Swiss dish in which veal is wrapped in ham and cheese and fried. Wisegeek
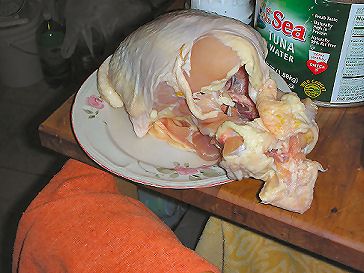
And here I’ve been thinking this was a Le Cordon Bleu dish…son of a gun. Oh well. So much for that! LOL! Remember that chicken we had left over back on Monday? It’s been waiting for today. Bone the breast, halve and pound it to 1/4 inch thickness (I use a gallon size zip-top bag coated with olive oil). Place the chicken half-breast on a length of plastic wrap on a damp cutting board. Either cut a battonette of whole cheese and enfold it in black forest ham (or prosciutto). I like to use a couple thin slices of ham around broken slices of swiss cheese. Fold the chicken up and around the cheese and ham like the filling in a burrito or egg roll, adjusting the plastic out as you work. Wrap the rolled chicken with the plastic. Place the wrapped, rolled portions in the freezer for at least 20 minutes. This will firm the shape, let the chicken rest a bit, and give us time to get the stock going.
Into a 3 quart saucepan, put the chicken skin, fat, and fatty pieces to render cooking fat. Meanwhile, roughly chop an onion, smash 2 cloves of garlic, slice half a peeled carrot and prepare a bouquet garni. Remove any large chicken pieces and add the chopped, smashed and sliced vegetables to the oil. Cook until onion is lightly carmelized. Add chicken pieces to pan and cover with water. Add the bouquet garni. Bring to a boil and simmer until the chicken is cooked.
When chicken has rested, stir an egg until it is well mixed. Dip the chicken portion in the egg, then into Panko crumbs. Repeat with remaining portions. Brown the chicken portions on all sides in an oven-ready skillet. When browned, move skillet to oven heated at 350ºF for 20-30 minutes, or until chicken tests done at the ends. Remove chicken to a platter and keep warm while preparing sauce.
Strain the stock into a heat-proof measuring cup (about a quart should be enough). Skim off a bit of fat from the top of the broth and make a blond roux with 2 Tbsp. of flour and 2 Tbsp. chicken fat. Add 2 cups of the chicken stock and a couple sprigs of thyme to the pan. Bring to a boil and simmer briefly. Serve extra sauce in a boat at the table.
I know…our assignment this week was to have fun today. And I did. This is what’s fun to me! Go poke around in the kitchen, see what we’ve got that I can mess with and have a blast. This wasn’t planned. It just happened to be what was in the house at the moment. Black forest ham was on sale last week, and we eat sandwiches almost every afternoon, so we always have cheese and sliced something here. One thing I love about Whisk Wednesdays is learning the techniques and combinations of flavors. There’s so many things I wouldn’t have thought of before! We’re really catching onto the differences a few herbs and essenses add to foods. Thanks so much Shari!!
Comments : 3 Comments »
Categories : Events, Home Cookin', Whisk Wednesday
Sproutibles
14 03 2009I know…it’s not a “real” word, but it stands for Sprouted-edibles. I’m very pleased to say that we’ve had our own sprouts consistently since January, with only the slightest little problems…we ran short of sprouts one week, and were a little overboard another. Here’s the story of the lifespan of a sproutible. Don’t blink…it goes by pretty darn quick!
Day 1 –
While I’m in the kitchen prepping dinner, I grab a wide-mouth pint canning jar and fill it halfway with slightly warm water. We usually have a mixture of sprouts: Alfalfa, radish, red clover and broccoli. I add 1 teaspoon of each seed to the jar, shake it a little to break up the bubbles, and leave it set for about 24 hours.
The technical part of what’s going on here, is that we’re softening the hulls of the seeds so that the embryonic plant inside can soak up some of that water and sprout! Water and the right temperature are the two things that tell seeds it’s time to grow. One without the other doesn’t work well. The seeds can be the right temperature to grow, but without moisture, they remain dormant. Water at the wrong temperature will yield swollen soggy seeds that can’t grow if the water is too cold, or cooked seeds if the water is too hot. It’s kind of that Goldilocks thing…it has to be “just right.” “Just right” and room temperature have a lot in common. That’s why lots of houseplants do well…it’s the right temperature for plants that don’t like a lot of drastic changes. But we’re sprouting edibles…back to it!
Day 2 –
After 24 hours, the water is slightly cloudy, and said to be full of nutrients. It is recommended to save this water for adding to anything that will be consumed soon. That having been said, I’m usually in a bit of a rush, and simply drain them and give them a good rinse. Rinsing temp should be about room temp. If the water is cold, it will shock the seedlings a bit and they won’t start growing again until they return to 60-something degrees. Rinse, drain, rinse, drain, set aside will our mantra for the next few days.
Day 3 –
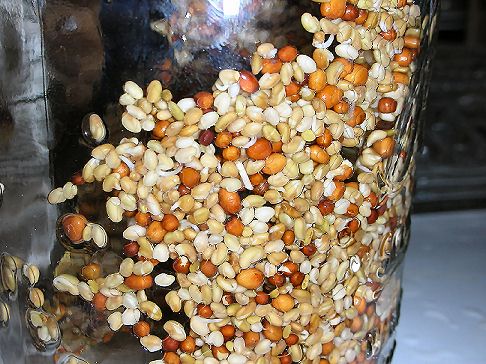
It’s now Wednesday morning. We perform the mantra… Rinse, drain, rinse, drain, set aside. We do the same thing at lunch time…Rinse, drain, rinse, drain, set aside. And now it’s time to fix supper again, and here’s what’s happened in just 48 hours:
The seeds are beginning to sprout. Look closely, you can see some of the root-tails coming out. Many of the seed hulls have split. These are all good things. Rinse, drain, rinse, drain, set aside.
Day 4
It’s morning. Whe we went to bed, the seeds had started to split. Here’s what we found this morning:
There are lots of roots this morning! Another mantra…Rinse, drain, rinse, drain, set aside. Do the same at noon…Rinse, drain, rinse, drain, set aside. And what does the evening bring?
The jar is now about half full of sprouts. It’s time to start swishing to loosen the seed hulls. Once the seed has sprouted, it doesn’t need the hull any more. When you rinse, just slosh the seeds around gently. We’ll be graduating to the next size screen soon. The leaves can’t access the light and turn green, by creating chlorophyll until they’re free of the seed hulls.
Sprouting lids or screens come in different sizes because seeds come in different sizes. This is a fine screen-lid. It will permit water to enter and be poured off but will keep seeds from flowing out with the water. At least once they’ve been soaked it will. The next size screen will be just a little larger and will do a very good job of keeping most of the sprouts in the jar while permitting the seed hulls to wash out of the jar. Seeds the size we’re using will only need these two screens. Seeds like mung bean seeds will start with the second screen, and graduate to one that has 3/8 inch openings.
Day 5 –
We’re still in the pint jar, but we’ve graduated to the next larger screen-lid. The jar is mostly full of sprouts. They’re suspended in water in this picture. We’ve got roots and bright green leaves now.
It’s Friday evening now. We’ve had to move the sprouts into a larger jar. This is a wide-mouthed quart jar-squarish, so it doesn’t roll. There are still seeds just beginning to sprout, so we aren’t ready to package them up just yet. There’s lots of plant life in the jar now. They’ll definitely need rinsing frequently if the days are very warm.
Day 6 ~
Saturday morning. Late morning, but still morning. Here are our sprouts before rinsing. Notice the condensation? That means it’s pretty warm inside the jar. The sprouts generate a certain amount of heat on their own…all that growing going on!
You’d be able to package these up in a ventilated container (save a sprout container…justify it because it’s the LAST you’ll ever have to buy!) and keep them in the refrigerator at this point if you wanted. I’m going to let them go another day or so. I’m interested to see where we are after 7 days…if they aren’t too “grown” up that is. I have a strawberry carton that I saved for sprouts. It holds a quart jar full. This batch may go to the half-gallon jar before they’re mature.
Comments : 1 Comment »
Categories : Home Cookin', Other stuff...
Poulet à la sauge
14 03 2009Fricassée de Poulet à l’ail et à la Sauge (Chicken Fricassee with Garlic and Sage) was our assignment for March 6th…timing didn’t work out so well for me, but I finally got to it on the 9th. This was a fabulous dish! I reduced it by half, and that worked well too.
 One of the fun things we do at Whisk Wednesdays is share how we do various things, or what our particular “something” is…this week we shared how we have our cookbooks while we’re working…this is pretty typical for me.
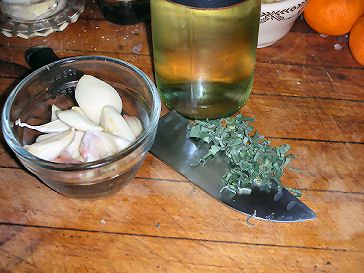
Our recipe calls for serving pieces of chicken, a substantial quantity of garlic-unpeeled, mind you! – thinly sliced sage and a cup of dry white wine. I tend to like to cook with Sauvignon Blanc or Pinot Grigio for the most part. This time I selected an Italian Pinot Grigio. When I tasted it, I was a little set back by the fruitiness, and questioned myself about adding it to this dish. In the end, I decided to go with it…thinking we might add another layer of flavor.
The first step is to heat the oven and brown the chicken pieces. I used the leg-thigh combination and the wings for the two of us, and reduced everything except the quantity of wine by half as well.
Garlic is added and cooked with the browned chicken. The garlic is supposed to be cooked without coloring. I lose a couple of points there. That’s about as brown as it got though, so it didn’t get too carmelized.
Add the wine, sprinkle on the sliced sage, cover and pop it into the oven for about enough time to steam a pot of rice. Do many people cook rice in pots on the stove top any more? Another interesting poll thought!
20-30 minutes later…this is what you’ve got… The meat was moist and so full of flavor! I know there was a comment among our group that the recipe was salt-heavy. I’d have to agree. If I hadn’t missed adding salt in one step, this wouldn’t have been nearly as balanced. I served this with steamed rice and a vegetable. We each ate the quarter, so the wings were left as well as a quantity of sauce. It made the yummiest lunch the next day!
This is another serious keeper recipe! There’s no cream, so it’s not heavy in fat, and it’s full of flavor. It also left me with the full breast for another dinner. This is starting to sound like something I could plan around! Watch the thread…I feel a series comin’ on!
Comments : 2 Comments »
Categories : Events, Home Cookin', Whisk Wednesday
The Egg Project – Day 1
1 03 2009We, in our infinite insanity, have purchased a few hatching eggs. We have Cochin chicken and Pekin duck eggs. Today is day 1 in the incubators. The two eggs have different requirements, so we have to use 2 different incubators. One is ours, the other we borrowed from the school I work for. If we achieve a hatch, we may let classrooms adopt some babies. It’s only fair. We adopted one classroom’s duckling project last year.
After quite a bit of Googling, we know that chicken eggs require 60% humidity and a temp of 99.5º for 18 days, then we raise the humidity to 80% and stop turning them for the last 3 days, or until hatched. There are a couple of times the eggs are supposed to be checked for viability, so those will be big post days.
Wait…stop the presses. The directions on the incubator lead us to believe it’s possible to keep both eggs in the same incubator… Ok. Works for us. Add 6 Pekin duck eggs to the mix now, and we’ve got a much more full incubator.
If this works…I really want to raise pheasants to return to the wild here. Kind of a 50-50 thing. Free to come and go, but always welcome to come in. We’ll see. I tend to get “mother-ish” with the critters. LOL!
We have several varieties of hen chickens (roosters – no), two different breeds of ducks (a Rouen and what looks to be a runner-cross), but they’re both drakes. At one point we had 7 ducks, and all 7 were drakes. Someone explain the law of averages on that one, please! Rather than take my chances at the local feed store, or have to buy 25 straight run of any one breed, I bought a couple smaller clutches of eggs on eBay. We’ll see how well this works. It’s early enough in the season that I can buy from either the feed store, or any number of other sources.
We’ll keep you posted.
Comments : 3 Comments »
Categories : Uncategorized
Class 22: Pintadeaux au Chou
1 03 2009Class 22 Les Volailles – Poultry
Part 1: Pintadeaux au Chou ~ Guinea Hens with Cabbage
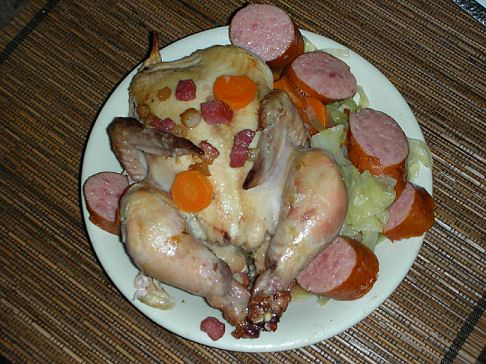
That sure doesn’t say much imply that there’s going to be a flavor party on your plate. But that’s exactly what’s going to happen… We all subbed Cornish Game Hen for the guinea hens, because guinea hen just isn’t marketed much, at least not in the US. I wonder how many of us have actually seen a guinea hen, much less tasted the meat? It’s really too bad, as guinea hen is darker meat and would have been luscious in this dish. Game hen is more white meat these days, which is much drier in texture. Nevertheless, this was a wonderful dish, especially for a cold, wet night!
The recipe (found in Le Cordon Bleu at Home) was easy enough to follow…loads of pans again. I did my steps out of order and managed to save using 2. I had lots of bowls on the side instead. *Ü* If I make it again (and I probably will…), I’d use a large, deep casserole dish…5 to 7 qt. I was using my 4 inch deep cast iron pan, and I barely fit everything in. I’d start my game hens upside down and turn them after 10 minutes, to breast up. Other than that…the game hens were flavorful, the vegetables were so tender and full of flavor! And the sausage managed to fill in all the corners providing a richness that was heavenly. You wanted a bit of everything on your fork… It did make an awful lot of food for 2 people though. Next time, I’ll try to cut the recipe in half…
And then again, maybe not. The left-overs worked into an incredible soup. I don’t have the faintest idea why this is so doggone yummy, but it surely is. I sliced some potato quarters about 1/4 inch thick and cooked them in a little butter and olive oil. Next, I added 1-1/2 cups of chicken broth, the white of a leek (sliced) and the remainder of the cabbage that I didn’t cook the night before. I brought all that to a boil, reduced the heat and simmered the mixture for about an hour. I boned the hens, and added the meat to the soup, then cut the remaining sausage into bites and set it aside until I was ready to add dumplings to it. Oh my. Pure comfort food on a rainy night!
One last thing…we’re supposed to tail our post with our favorite plates…
I love my black plates. I don’t have a set, I have individual plates, different sizes, different angles… It started as a sushi thing. The quarter round plates are ideal for sushi handrolls. I have a rectangular plate too. I think I have a pair of round salad plates too, but maybe not. *Ü* I love these plates for photography. They’re great to help colors POP! Yes, I confess…I occasionally buy plates for their photogenic qualities. If it looks good in a photo, it’s going to look just as good on a buffet table!
Until next time…Happy Whisking!
Comments : 4 Comments »
Categories : Events, Home Cookin', Whisk Wednesday
